Happy Saturday everyone!!! Bit late today, I know, but the Blattman is starting work a little later today, so it has been nice to get some time together before he goes. I am also having epic issues with my computer being the slowest thing in the world!!! I have also been trying to work out what to knit. Does anyone else get that? Where you keep looking at patterns and the yarn you have and just never manage to pick one? This happens to me on a big scale. I have knit so many patterns and sometimes I just need a bit of a kick. I wanted to do a techniques post on using stitch markers, but I haven't picked up a pattern to knit using stitch markers so I'll do that next Saturday.
On today's techniques post I am going to be talking about Substitution. These things are kinda basic for all you advanced knitters but I think its worth talking about. I was confused initially about this when I started knitting and relied on my Mum to talk me through it and help me out. Hopefully I can explain a bit about it as well as she does.
All patterns are knit or tested with a particular yarn. You will find this especially in magazines, because they use one yarn for their pattern and for the samples for the photographs. But in a lot of magazines the yarn they use is either so difficult to find or so blooming expensive that there is no way you can afford to knit it. I am definitely a great believer in Substitution. I love to check out my stash and use what is in there rather than have to go out and buy more. There are a few things to remember when it comes to Substitution.
1. Use Same or Similar Fibres. Each yarn is made from a different combination of fibres and each one knits differently. If you knit a pattern designed for a pure wool yarn in cotton, it probably isn't going to work out!
2. Work out How much you will need. When you buy yarn, on the label it will tell you how much is on a ball. Find out how many balls of the pattern yarn will be used for your size. Check how many yards or metres are on each of the original balls and then add it up to work out how much is recommended. When you buy your preferred choice, check on the ball band there how many yards or metres is on one of those, and work out how many you will need.
3. Check Tension. Tension Square= Tension Headache. Not really. Each thickness of yarn has its own tension, and each ball will have its own tension. A pure wool yarn will have a different tension to a cotton yarn. Some yarns will require bigger needles but still be a chunky weight yarn. Check out the tension square on the ball band to show this.
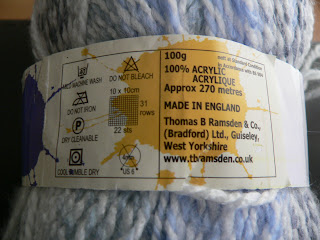
Here we go, here is an example of a ball band. This particular one is from Robin Picasso DK. You can see from this that there are the washing instructions, the tension square there, the recommended needle size, and the 270 metres on the ball there.
For internet patterns this can be the same as the magazine patterns, but with Ravelry you tend to find that the test knitters use all sorts of yarn, and with the great project gallery you can normally find the yarn that you want to use!!
Only 2 more days for the competition before it closes so make sure all you followers that you enter for a chance to win!! Have a great weekend all!!

No comments:
Post a Comment